
If you’re looking for ways to install QuickBooks Database Server Manager on your system, consider this step-wise guide. This post covers numerous facets regarding the installation procedure and enlightens you on how to update after install. So stay tuned to find all the sections within the article.
Intuit has released different tools for better user experience, and QuickBooks Database Server manager tops the list. When you connect to QuickBooks DB Manager, multi-user access is accomplished with ease. Additionally, by utilizing QB Database Server Manager, multiple users can work on a common company file in a multi-user environment in a network. The only thing is that the tool is to be installed for each QuickBooks Desktop version. In this detailed blog, we cover the widely asked question of how to install QuickBooks Database Server Manager on your system. Eventually, you will figure out the ways to use it for handling multiple computers on the network server.
Are you facing challenges in installing the QuickBooks Database Server Manager on your system yourself? Consider getting in touch with the QuickBooks specialists at +1- 855 738 2784. One of our tech experts will help you to set up and run QuickBooks manager and solve any errors related to it

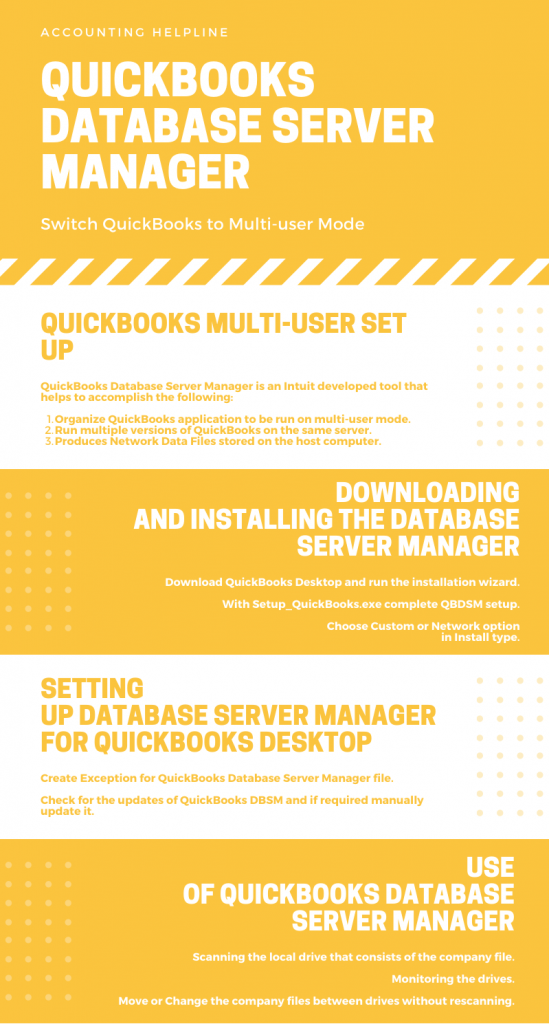
What is QuickBooks Database Server Manager?
The QuickBooks Database Server Manager utility basically enables configuring the QuickBooks server for multi-user access. This tool assists in developing the network data file, represented by the .nd extension and the company file on the host computer. Also known as Intuit’s personal database management tool, the database server manager enables creating the network data and company files for hosting on the server and the workstations.
Further, if the user is keen on using multiple versions of QuickBooks Desktop, this effective tool will be helpful. The multi-user mode is only possible through this tool. So, if a user wishes to learn how to install QuickBooks database server manager for multi-user mode, they should consider this in-depth guide to assist them.
The activities performed by the QB database server manager include the following:
- It enables sharing the company files over the network with other computers for simultaneous access and utilization by multiple users.
- Scanning the QB company files to utilize the multi-user mode and offering access to all the users.
- Checking the local storage and detecting a new company file automatically is another activity performed by QuickBooks Database Server Manager 2023.
Now, let’s dive into the installation procedure of the QBDBMgrn on the system.
Recommended To Read – Getting QuickBooks Migration Failed Unexpectedly Issue
Install QuickBooks Database Server Manager
Look into the following steps to begin the QuickBooks Database Server Manager download:
Download QuickBooks Database Server Manager
You will not come across any special provision to download QuickBooks Database Server Manager. QB Database Server Manager is part of the QuickBooks Desktop. Hence, when you download the QuickBooks desktop, QuickBooks Database Manager is downloaded with it. Here are the quick steps to install QuickBooks Desktop.
- Download QuickBooks Desktop from the QuickBooks Product Download Page.
- Save the file to an easily accessible location.
- Open the downloaded QuickBooks.exe file and agree to the software License Agreement.
- Click Next and enter the Product and License Number.
- Decide the Install type from Express, or Custom and Network.
- After that, finally, Activate and Update QuickBooks Desktop. to successfully download QuickBooks Database Manager.
Download QuickBooks Database Server Manager
Install Database Server Manager on the Server Computer
After the QuickBooks Server Manager download, the process to Install the Database Server Manager is to be employed on the server computer. By server computer, we mean the computer which will host your company files. Go through the steps below to carry out installing QuickBooks on a server for the QuickBooks database manager.
- Close all the running programs on the server computer, and that includes QuickBooks as well.
- Search for QuickBooks.exe and follow the installation instructions as they appear on the screen.
- On being asked about the install type, choose Custom or Network Options.
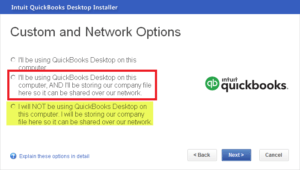
- Press Next without selecting Express.
- Choose the option best for network setup and then click Next.
For the users who will make use of DB Manager as well as QB Desktop on the server computer, choose: I’ll be using QuickBooks Desktop on this computer, AND I’ll be storing…
In the second scenario, where only the Database Server Manager will be put to use on the server computer, choose: I will NOT be using QuickBooks Desktop…
- Once done with the instructions, hit Install to get QuickBooks on a server.
Note: If you host multiple versions of QuickBooks desktop on your network, install them in order from the oldest first to the most recent at the end.
Provide QuickBooks Database Manager Permission to Run on the Server Computer
If you have to install QuickBooks on multiple computers, ensure to get the necessary permissions:
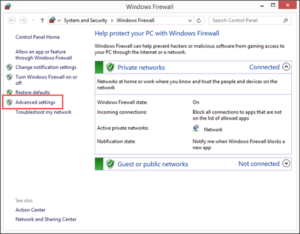
- Configure the Firewall manually so as to let QuickBooks Database Manager run on your server computer.
- Click on the Start menu and search for Windows Firewall. Click on it to open it.

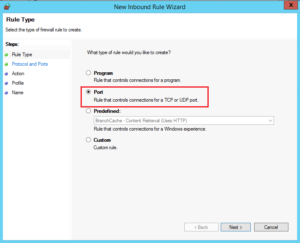
- From the Advanced Settings, right-click on Inbound Rules and select New Rule.
- Choose Port and hit Next.
- Ensure that TCP must be selected. After this, enter in the specific ports in specific Local Ports The port format is as per the QuickBooks version you are using.
- QuickBooks Desktop 2020: 8019, XXXXX.
- QB Desktop 2019: 8019, XXXXX.
- QuickBooks Desktop 2018: 8019, 56728, 55378-55382.
- QuickBooks Desktop 2017: 8019, 56727, 55373-55377.
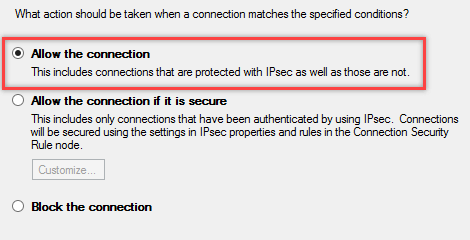
- Once you have entered the port number, click Next and Allow the Connection.
- Hit Next and when asked, mark all the profiles. Click Next once again.
- Finally, create a rule. Give it a name like “QBPorts (year).”
- When you’re done, select Finish.
*The same steps are to be repeated to create Outbound Rules. In the step 3, choose Outbound Rules and move forward as above.*
Further, to create an Exception for QuickBooks Database Server Manager File, create it by following the steps mentioned below:
After you download QuickBooks database server manager, do create exceptions in the firewall for uninterrupted running of the application:
- From the Start menu search for Windows Firewall and click on it.
- Select Advanced Settings and right-click on Inbound Rules (Follow the same for Outbound Rules later). Click on New Rule.
- Select the Program and then Next to Choose This Program Path.
- Using Browse, select the following files
- DBManager.exe-C:\Program Files\Intuit\QuickBooks YEAR
- QBDBMgrN.exe-C:\Program Files\Intuit\QuickBooks YEAR
- Hit on Next and select Allow the Connection.
- When prompted, see that all files are marked and select Next.
- Finally create a rule with name like QBExceptFirewall with .exe extension.
- At last, to Provide QB Database Manager permission to run on the server computer, repeat the steps for Outbound Rules. Hopefully, you have learnt how to connect QuickBooks to server.
Check for QuickBooks Database Server Manager Update
QBDB Server Manager Update is not to be done separately. Whenever you update your QuickBooks Desktop, it automatically installs the latest updates. To manually update it, you can follow the method given below:
- Open the Windows Start menu and click on Programs.
- Search for QB DB Server Manager and hit on Updates.
- Follow the on-screen instructions to complete QuickBooks Database Server Manager Update
- For more info read our Article on how to install latest QuickBooks 2023 Server Manager updates..
Putting DB Server Manager for QuickBooks Desktop to use
Now, let’s dive into how to use QuickBooks Database Server Manager. Given below are the steps to host the company file over a network by using QBDBMgrN for QuickBooks Desktop.
Step 1: Scan the Folder
- This step is to be done only once before you share your company files.
- From the server computer, open QB Database Server Manager.
- Navigate to Scan Folders tab and click on Browse.

- Choose the folders that hold your company files (QBW).
- Click on OK after selecting the folder and select Start Scan.
*On completion of the scan, the folders become available in the “QuickBooks company files found” section. They then become accessible from other computers on the network.*
Step 2: Monitor your Drives
The scanned folders are held in the drives that appear under the Monitored Drives tab. Monitoring your drives will ensure that re-scan won’t be needed if you move or change your company files in them.
- Choose the Monitored Drives From there check-mark the boxes next to Hard Drive that hold your company files.
- At last close it and if you ever change or move the company file on the drives, re-scanning won’t be required.
Step 3: Manage the Database Server Manager
Check the other tabs in the Database Server Manager that keep everything running smoothly.
- Locate the Systems tab that helps you know where the database server manager is installed on the computer.
- The server tab of the database manager tells the real-time status of the tool and who is connected to it.
Solutions for error related to QB DB Server Manager
If any error crops up while you are using the database manager, consider the following points:
Restart the QuickBooks Database Server Manager
Sometimes just restarting the program can help you get rid of any glitch that might crop up. Ensure to restart it on your server computer that hosts the company file. Follow the steps in your current setup to restart.
When both QB Desktop and Database Server Manager are installed on server computer:
- Open QB Desktop on the host computer and from the File menu, select Open or Restore Company.

- Click on Open Company file and open your company file.
- Hit on Next and check-mark Open file in multi-user mode option.
- Select Open and log in to your company file.
- With the use of Close Company/Log off, close the company file on the server.
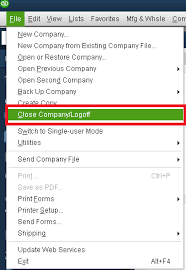
- After this you need to type Database in the Windows Start menu and run QBDB Server Manager.
Read Also – Fix QuickBooks Error (-12 0)
If only the Database Server Manager is installed
- Search and open the Control Panel from Windows Start
- Click on Administrative Tools to choose Services from the list.

- Right-click the QuickBooksDBXX service and then select Restart.
FAQs on QuickBooks Server Manager
Here take a quick look at FAQs on QuickBooks Server Manager to get the answers some of the most common questions:
Ques: What is the need of QuickBooks DBSM?
Ans: QuickBooks DBSM helps to run multi-user mode in QuickBooks . It creates network data files for each company file that is available on the hosting server.
Ques: What is the process to repair QuickBooks Database manager?
Ans: Using the QuickBooks Rebuild Data Utility, it is possible to repair the QBDBSM.
Ques: How to uninstall QuickBooks manager?
Ans: QuickBooks manager can be uninstalled if you aren’t on the multi-user mode by using the steps below
- From the Start menu of Windows, click on Programs and Features.
- Click on QuickBooks Database Server Manager and choose Uninstall or Change at the top of the window.
- Go through the on-screen steps to uninstall the QuickBooks Network Manager.
Ques: What are some important points regarding QuickBooks Database Server Manager?
The QBDBMgrN has some essential points you must consider:
- This tool enables using the multiple versions of QB processes rather than multiple versions of the software.
- You need a database manager separately installed for each software version on your system.
- This tool adds a user to the desktop when you use it.
- When using multiple QuickBooks Desktop versions, ensure to install the QuickBooks Database Server manager in chronological order from the oldest to the newest version.
- Always have the latest version of the database manager on your system.
- The database server manager is not useful where you do not need to run the files on a multi-network setup and with multiple users accessing the files simultaneously.
With complete detail into QuickBooks Database Server Manager, we hope you can successfully install and use it. If you feel like contacting the QuickBooks Experts to solve your query related to Intuit Network Manager, talk to our experts at +1- 855 738 2784, and get an instant fix.
Related Posts –
Detailed Insights into Error Codes and QuickBooks Error Support
Effective Ways to Fix QuickBooks Error 3371 Status Code 11118
What is QuickBooks Data Migration Service & How to do Migration
Quick Troubleshooting Guide to Fix QuickBooks Error 1723
Resolve QuickBooks 2023 Keeps Crashing Issues with this Comprehensive Guide
Summary
Article Name
How to Install QuickBooks Database Server Manager on Windows
Description
Intuit has released different tools for better user experience, and QuickBooks Database Server manager tops the list. QuickBooks Database Server Manager is part of the QuickBooks Desktop software. Utilizing QB Database Server Manager, multiple users can work on the same company file in multi-user environment in a network. It creates network data files for each company file that is stored on the hosting server.
Author
Accounting Helpline
Publisher Name
Accounting Helpline
Publisher Logo
